Monday, August 24, 2020

Birthday Bash: 5 things to do on your birthday

It was my birthday on Aug 22 and it was a Saturday. What better way to celebrate that than to spend in 2 days of learning and action?

1. Charging the batteries

    What started off as a routine thing after the  COVID inactivity period quickly turned into an involved activity with some batteries needing some tender loving care and some just needing top-up. Surprisingly the Skoda Octavia Mk2 battery was the most surprising of them all. More abt that later.

The Harley battery is a bit of a cheat story as i started this one the mid of last week. That was the most affected and it was close to 5 volts when tested. very bad! Connected it to the tender and the thing steadily climbed. Over the weekend, it attained full charge after probably 100+ hours. Need to see if the AGM is robust enough after this episode. The interesting thing here is, the Bosch charger which has an AGM mode refused to charge. The Bosch charge also is an intelligent one with 6/12 V sensing, overcharge protection, battery reviving pulse charging and all. The downside is, it refuses to charge overly discharged 12v batteries. The Harley battery tender was a life saver. Proves that such a simple things as a battery charger need not be that intelligent afterall! 

Wife's Yamaha was next. That needed a maintenance after some bad patches..or that's what i thought. In fact, it was in much better shape that i expected. Also, that was the vehicle which mostly gets used, so that wasn't a surprise ..Still, gave it a cleaning and checked cells and electrolyte. Also made a mental note to get a sealed lead acid if possible as there was some dirty stuff near a couple of cell caps. Luckily, the electrolyte levels were good.

The Octavia Mk2 was untouched for the last 3-4 months and this being the most used family car, planned more time for that. After getting in, the routine check showed all console lights with good brightness which meant the thing was not dead. Just wanted to crank and try, but resisted the temptation as that might clearly pull the plug on a weak battery. However, seeing the consistency of all electricals, just tried the horn and was it strong! a bit bold, cranked and it came to life in the first cranking, just like the way it was. Looks like quite some thought has gone into engineering the electricals in this one. Love this piece of machinery.

In sharp contrast, Octavia Mk1 says a different story. That was notorious for battery drain and 2-3 weeks of inactivity always showed on the dashboard with the weak lights. In 2 months the thing would be definitely dead. And it was!..on a brand new battery fully charged and loaded just before tucking in to sleep for COVID days. I hope there might not be sulphation or anything which cannot be fixed. That's for another weekend.


2. Playing around with Arduino Uno R3

This time i thought the best gift that i can get is to buy my son an Arduino kit. He wanted to tread the waters and what better way than to learn it with him! This is the super starter kit from Quadstore  and they have quite a nice Downloads section where there are a lot of examples which work out of the box with the components in the kit. 


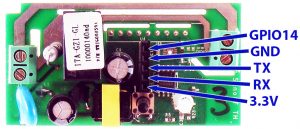
All this is warming up to the Arduino Mega 2560 + Wifi board for a cool new project. That board combines the power and simplicity or Arduino and the ease of communication over wifi with the on-board esp 8266 which talks to the Mega over Serial. More on that later.

It was fun playing around with the SG90 servo, temp module. I have to say, the stepper motor needs more understanding as i could run the basic things, but controlling it with a potentiometer was not fully successful. The RGB LED was cool and Rithvik liked it the best, after the servo. The code implementations in most are really interesting..lot to learn. The warning based on distance with the Ultrasound module was my fav. There are lots of sensors and stuff to explore in this kit itself like IR receivers, tilt sensors, displays, etc and there's even a esp8266 daughter board. 

I'm also having a huge interest in the new CircuitPython boards which doesn't need compiling! Sweet...just like Python... They look very promising and so intuitive to a Python person like me.

3. Installing Height speakers to complete the 5.2.2 setup

The audiophile in me was searching for a worthy successor to the 10 yr old Harman Kardon AVR 134 and found that in a Marantz SR 5014. HK was a 5.1 unit and Marantz is a 7.2 unit. Though not much of a movie fan, always wanted to check out the ATMOS setup. Decided to go ahead with the Top Middle config for the height channel as most others are not that great. Tried the Front Dolby with normal speakers and the sound bleeding was horrible. The sound was supposed to reflect from the ceiling and i was getting it from everywhere, mostly from the speaker directly as they were radiating sideways as well. This is a case of you-get-it-when-you-don't-want-it as good off-axis performance of speakers is something of a necessity to have good sound stage. Also, the reviews about proper front dolby speakers were not that inspiring confidence. Also,  had a couple of JBLs lying around which is a perfect thing to take to the ceiling. 

Needed a clamp to mount the speakers on the ceiling with M6 anchor bolts. Amazon had the perfect clamp

Fixing the speakers to the clamp was a bit tricky as the JBLs didn't have a screw mount. So reused the hook-like mount and this meant a plate was needed to connect the hook-mount to the clamp. This came from a 1.5 inch aluminium angle from an old job.


The installation looks good, need some cosmetic adjustments though.

Configuration was manual with distances measured and levels set to +4db from with ref to surrounds. I use full range towers in surrounds, so they sound louder compared to the height speakers, so +4db sounds good, have a feeling it might be better with +6db, needs to see.

Dolby gives some nice demos to test, check them out, they're awesome...

LEAF TRAILER

AMAZE TRAILER


4. Setup AdGuard in Home Assistant

Wanted to see a way to optimize and protect the network from junk traffic and found that Home Assistant users already have this in the form of AdGuard, which is a better version of PiHole. Anyone who wants to clean up their traffic should have this, if there is a Linux box running 24x7. Home Assistant provides this as a community add-on and is the work of the awesome Frenck. This is not fully done yet for me as i still get the 'dns port in use' error and this needs to be fixed. The preliminary work is in setting the static IP and external DNS. Allocating an IP in router is not enough, this needs to be set in the machine itself where HA runs.

How to set static IP in Ubuntu Server 18.04 is here. This is now configured thru "Netplan" as  /etc/network/interfaces is not used anymore. More here. I didn't have the file 01-netcfg.yaml, so had to create it. The configuration is in yaml, so indentation is important

If you are connecting thru ssh to your headless server, make sure the new IP is not having duplicates in your router DHCP settings and that it is in your subnet. Failing that, the only way is to physically connect a monitor Don't ask me how i know.

DNS port error fixed:

Stop and sisable the service systemd-resolved

sudo systemctl stop systemd-resolved.service

sudo systemctl disable systemd-resolved.service

5. Pydroid 

SL4A and Python apps in android were a nice way to extend the Python experience to android devices. Now this has gone up a notch by the Pydroid app. It is very user-friendly and has a clean interface and is quite usable. There a minimal autocompletion and easy module import. The pip is well-integrated in this and searches the actual pypi, though some modules (maybe most) are not for the device. I'm more interested in the ones which didn't install, so will check back what happened. They are gdal and pandas. Geopy, shapely and many others went smooth. 

Menu

PyPi module search

Interpreter

Terminal


The experience is one of the best in an android device. Haven't tried if there is a module which exposes android sensors and stuff, but that's an easy guess, i hope. Some modules are for premium users, but Rs 299 for lifetime license is a minimal investment for a tool of this stature, especially if you love Python. 

Thursday, March 19, 2020

EASY and FAST Corona Virus dashboard in Home Assistant

I had setup the Plex integration for Home Assistant in the traditional way and had planned to try out the new way of integrating through the (vastly) improved interface for a long time. Seeing that there was quite some accumulation of Android Debug Bridge Server errors, wanted to correct that as well. I have to admit that I couldn't make much progress with the Rock64 running on Android TV 7.1 after the latest flashing, though it was working earlier and decided to wait.

For the Plex part, it was quite a breeze. After the setup, the Plex sensor, Plex media player and other mediaplayers connected to Plex were added. Config as below.

  • delete or rename the plex.conf
  • delete the config.yaml entries for plex:
  • remove any integrations
  • add an integration via integrations page.
It looks like this after the integrations were detected.
  

That was quick. Something struck the eye as I was going thru the list of new integrations and there was an item "Coronavirus". Since this is something in everyone's mind, I was curious and added the integration, which asks for the country name and then adds 4 items (confirmed, current, recovered, deaths) in each country as a sensor. The unit is people, of course.

After that, the states page shows 4 new entries, like so:

Added 2 more countries: UAE and Switzerland just for reference coz my brother stays in UAE and Switzerland is where my colleagues are. Now i have 12 sensors, GREAT!

There are various ways to have this in a graph, depending whether if it is on a web dashboard, mobile console or app. The lowest hanging fruit was the lovelace for my consoles running that. It was fairly easy setting up this card. My config below for the confirmed cases in 3 countries.

      - type: history-graph
        title: ''
        hours_to_show: 80
        entities:
          - entity: sensor.india_coronavirus_confirmed
            name: IN
          - entity: sensor.switzerland_coronavirus_confirmed
            name: CH
          - entity: sensor.united_arab_emirates_coronavirus_confirmed
            name: UAE
The dashboard in the mobile app looks useful!

The next plan is to have the Grafana chart pulling info from InfluxDB which offers infinite customization options. A sneak preview of what's cooking. 


Saturday, January 20, 2018

Flashing Sonoff without Arduino IDE

Introduction

After thinking for well over an year, I finally decided it is time to JUST DO IT! Especially after reaching nearly the end of a carpc project, found the time to work on this project and started gathering components

Ordered the Sonoff Basic and  4Channel (not the Pro) just to get a flavour of what is expected of me as part of the learning curve in attempting to connect proprietary devices to my own server. All of this is done without the Arduino IDE.


Why not off-the-shelf Apps

Sonoffs work very well with the eWelink Android app, used it for quite sometime before I decided that it is not what I wanted to do. There is very less control over the behaviour. I also don't want to send my data to anybody else's DB, especially,of my house. But for beginners who dont want to do any programming, this is an ideal and cheap platform for entering the smart home space. There's a whole lot of Sonoff devices for every purpose (well, almost)

Reprogramming Sonoff

Devices

For flashing the devices, we need the USB to TTL converter. Got the
CP2102 USB 2.0 to TTL UART Serial Converter from Amazon


Also, to connect the Serial converter to Sonoff, we need a 0.1" pitch 5-pin header connector strip, which is also available on Amazon. I got the set of 10.

Firmwares

Did some research on the firmwares available
ESPEasy 
  -Easy to flash and use
  -simple enough for starters to understand
  -good support
Tasmota
  -very comprehensive set of feaatures
  -complex flashing process (at least, that's what I thought)
  -extensive support and documentation

I got hooked on to the ESPEasy (coz of the perceived ease of use) at the beginning.

Pinouts and connection

The Sonoff basic doesn't have the pins on the board, but the pads are kept ready for accommodating 5 pins. Solder the 0.1" pitch 5-pin header connector to the board and it is ready to be connected to the serial connecter.
back to basics

After soldering

0.1" (2.54mm) pitch 40 pin header


Pins soldered

Connected the Sonoff to the TTL connector via 4 female to female jumpers, following this pinouts diagram. This is from Jonathan's Sonoff secrets page, a cool resource for sonoff customization.


My Serial device has  the DTR and 5v (never use this!) pins and are not connected for this purpose.

Serial Connector device preparation

The serial device was not installed properly when connected, so needed drivers. Updated using drivers from this repo. I needed Win7 drivers and updated it from local files saved from the repo. "Scan for hardware changes" and everything was running perfect, I got a COM5. This could be checked in the Device Manager> Ports

Uploaders and process

Got the uploader ESPEasy_120 stable build from the ESPEasy Wiki.
The download comes with the images for 512,1024 and 4096 memory chip versions. The process is started by running the flash.cmd in the folder. The 3 parameters asked are :
1. com port : 5 (from Device manager as above)
2. memory size :1024 (for sonoff basic)
3. build version: 120

The line that runs the actual command is highlighted:

@echo offset /p comport= Comport (example 3, 4, ..)           :
set /p fsize= Flash Size (example 512, 1024, 4096) :
set /p build= Build (example 71, 72, ..)           :
echo Using com port: %comport%echo Using bin file: ESPEasy_R%build%_%fsize%.bin
esptool.exe -vv -cd nodemcu -cb 115200 -cp COM%comport% -ca 0x00000 -cf ESPEasy_R%build%_%fsize%.bin
pause

Issues

There  was no response from the sonoff after the power cycle and it turns out that this is a classic case of the boot error in newer devices coz of the infamous PN25F08B flash memory. Turns out mine is the same too and it needs the DOUT param as mentioned in this discussion.


esptool.exe -vv -cd nodemcu -cb 115200 -cp COM%comport% -ca 0x00000 -bm dout -cf ESPEasy_R%build%_%fsize%.bin

Tried adding the DOUT parameter to the flash.cmd line by editing the command, but still with no results. Also, some FTDIs don't supply enough power to create an AP after the power cycle, so tried powering the device from the mains connected as well, in between all the trials.

Solution

Could've tried one last time with -fm instead of -bm as the below working command, but was reading on the alternatives by this time and thought Tasmota may be not that difficult, after all. Being a python person, seeing the python upload tool in tasmota site also helped in a huge way to decide going for it. Downloaded the Sonoff image and the ESPtool

Installing Python
Installed the python tool by opening a command window in the extracted folder and running
python setup.py install


The above step needs python (2.x or 3.x, I have 2.7) to be installed in the machine, and can be downloaded and installed from  www.python.org.

The sonoff.bin was renamed to tasmota.bin and kept in the same directory as the esptool.py. 

Flashing

After all those trials, it is better to cleanup and performed an erase, and then flashed. Results below

L:\smart_home\uploaders\esptool-2.2\esptool-2.2>esptool.py --port COM5 erase_flash
esptool.py v2.2Connecting....
Detecting chip type...
ESP8266Chip is ESP8266EXUploading stub...
Running stub...
Stub running...
Erasing flash (this may take a while)...
Chip erase completed successfully in 2.4s
Hard resetting...


L:\smart_home\uploaders\esptool-2.2\esptool-2.2>esptool.py --port COM5 write_flash -fs 1MB -fm dout 0x0 tasmota.bin
esptool.py v2.2Connecting....
Detecting chip type...
ESP8266Chip is ESP8266EXUploading stub...
Running stub...
Stub running...
Configuring flash size...
Compressed 495808 bytes to 341889...
Wrote 495808 bytes (341889 compressed) at 0x00000000 in 30.7 seconds (effective129.2 kbit/s)...
Hash of data verified.
Leaving...
Hard resetting...

After flash

Initial Configuration

All was good after the power cycle and the button needs 4 short presses to see an AP from the ESP module. Details of all button presses  here.
Connected to the Open AP from mobile and going to 192.168..4.1 from a browser in the connected machne. There, we need to set the WiFi settings. Enter the SSID and Password for upto 2 APs (if needed) and leave the others as they are.

Connecting to the device

Find the IP of the device
-in FING (remember to connect to 2.4 GHz network)
-from Router page (under status/clients/dhcp list)


Configuration after the Sonoff connects to the SSID

Main menu will show the state and additional config page buttons
Toggle button toggles ON/OFF
Pushing the button in device also updates the state.

Config Module>
Type: Basic
Everything else: None

Config MQTT>
host/pwd: if already running a server;otherwise leave as is
topic:unique name for the sonoff device (eg:sonoff_1)

The device is ready to be connected to MQTT Apps. 

Documentation:
Sonoff Basic
Sonoff 4 Channel


Saturday, February 19, 2011

Connecting Windows Mobile to Tikona

Hi friends,

In continuation of the post on connecting Desktop/Laptop PC to Tikona over wifi , here comes the promised part, on how to connect your wifi-enabled mobile to Tikona network and get access to the internet.

Before starting anything, let's make basic stuff clear. This method works with the Ruckus C-shaped Gateway that Tikona provides. This method connects your mobile directly to the Ruckus Gateway. No tweaking/hacking of the router is required. The mobile device should have the capability to add new hidden networks with WPA2 or WPA2-Enterprise security.

There are other methods also like sharing the available internet in a pc/laptop through wifi and then connecting to that wifi as Ad-Hoc connection. The scope of this blog is not to explore that, especially because that's a fairly simple method with a lot of inconveniences. Another method would be to connect a wifi router to the output of Tikona Ruckus/NanoStation devices and connect to that wireless network, effectively using it as a bridge. The advantage of the first is that the internet is already connected and no authentication is required. The second might require authentication in each connecting device, be it a mobile or a laptop or a desktop with a wifi dongle/adapter, but I haven't tried that yet.

So, coming to our topic of interest...

In the wifi settings of the mobile, Add a new network with these parameters:

Name and SSID:tikonawifi
"This is a hidden Network"

Security Type:WPA2
Encryption:AES
Network Key cannot be input, but that's OK coz it will be asked during the connection, first time.

Network Authentication Method: PEAP

When connectiong, it brings up a dialog box asking for
username:tikona userid
password:password
Domain:Leave Blank
Save Password

Maybe a few trials would be needed the first time, but after that it connects automatically, whenever it is in range and wifi is on. Also, it is better to try with no other MAC id devices connected. It would do good also to check if the MAC id list if full. In that case, remove one and try again.

It was that easy????
You bet :)

Friday, February 18, 2011

How to connect desktop to Tikona over WiFi (a.k.a Tikona all home configuration/settings)

Hello guys,
I've been using Tikona for quite sometime using the Ruckus Gateway/Router(better known as U-shaped modem). The subscription came with an all home option, but I've never been able to connect the desktop via wifi to it. Tried the latest dialer from Tikona, which is supposed to establish the connection automatically, with no progress. The service engineer checked it thoroughly and announced that either my USB wifi adapter's drivers are not proper or the wifi option is not enabled in the router and that I need to call the advanced support team to enable it. The advanced support team was not of much help. So, I just gave in and because the units are fully customized by Tikona, there's nothing that we can do to enable it or make some changes in the way they behave/connect. There's virtually no document anywhere as to how to do anything, either. I also contemplated exploring the option of using an Access Point cum Router in Bridge/Repeater Mode to wifi-enable my desktop and winmobile. This is still in my mind, and would be explored later.

Before spending on an AP, I just thought about having some more experiments with the unit. I wanted to see what exactly the dialer does, coz it is said to connect to some hidden network. Fired up the dialer, set the adapter to the wireless and asked it to connect using all home, all the while keeping a watch on the wireless networks in view. Voila! A new network by the name "TDN-Home" is added and later, it disappears and another one, "tikonawifi", comes up. But in any case, the pc is not connecting to the wifi network and so the authentication fails. The newly created networks are also deleted. I decided to explore it further and while it is there, opened up the tikonawifi entry and got out the parameters from it.

They are:
SSID:tikonawifi
Security Type:WPA2-Enterprise
Encryption:AES
Network Authentication Method: PEAP

With these, I added a wireless network to my desktop and it connected beautifully, after asking for the username and password. Once the wifi network connection is established, login page loads which can be used to connect to the Net. This way, I can connect using wifi to the router without any problems after that. If anybody faces problems reg this, I'm available for further discussion.

I also connected my HTC Hermes to the same gateway using wifi, but that's another post!! I personally think the way for mobile would be pretty same for any device, given they have those options. The only limiting factor is the number of authenticated MAC addresses you can have in any given time, but that's a limit imposed by Tikona.

Hope this helps anyone who's trying to get the all home working with their desktops/laptops.

Go Wirefree!!!

Thursday, June 19, 2008

Ponmudi Trek with ANAG

I recently stumbled upon a blog which gave me immense pleasure and really made me wet my hands a little on the huge potential of google maps and display of our own data. This is the blog and I really wanna thank the author, Brian who, along with Stacy, enjoys a very active Hiking 'n Biking life.
Cheers to you, Brian!
I just tried this stuff, though with limited accessories, and as an example i took my trek path at Ponmudi to Panayam-Ponmudi Falls. The area is stunning and the trek, easy. The team was ANAG(Agasthya Nature Action Group) and there were 5 members including me.

I have some plans to embellish it with some geotagged pics and other stuff, so watch out this link.


This is the trekpath with some waypoints.

Monday, February 11, 2008

Gadget of future


Airwash waterless washing machine promises to change clothes washing forever!
Airwash makes your clothes clean, but use no water or detergents.

Airwash uses negative ions, compressed air and deodorants to clean our clothes. This future gadget was inspired by the waterfall, nature’s negative ion generator.
Eliminating the use of detergent and water Airwash will be one of the most important eco gadgets.

Ergo Tech


Inflatable multimedia speakers systems


GroundSurf electric skateboard guided by Windows Mobile